Monday, March 31, 2008

Filo Tips and Recipe for Greek Leek Pie – Prasopita (Πρασόπιτα)

Friday night’s Prasopita (prah-SO-pee-tah, Greek leek pie) tasted great, but producing it was not pretty. I learned, yet again, to embrace kitchen disasters for their educational benefits.

It was one of those evenings where everything went wrong. From dodging falling knives to cleaning up egg-splattered floorboards, the frustrations accumulated. It was typical that I opened the filo and found the sheets of pastry inseparably stuck together. All but six were unusable and went straight into the garbage.

I quickly mixed up dough for an olive oil crust, and switched to making tri-cornered hand pies. Unfortunately, I didn’t make nearly enough pastry dough. It started running out while I still had a bowlful of filling. Too impatient to make more pastry, I rolled up the remaining dough and made an open-face, free-form tart.


Prasopita and Leek TartWhen I was done, I had three filo-wrapped traditional Prasopites, six tri-cornered leek hand pies, and one free-form leek tart. Although I hadn’t planned it, this gave us the opportunity to directly compare filo-wrapped pies with those having a simple olive oil crust. The comparison was enlightening.

As between the filo and hand pies, it wasn’t a close call; the filo pies were far superior. Crisp filo pastry was the perfect counterpoint to the savory leek filling. Although the hand pie crust was flaky, the filling to crust ratio was too low and the crust’s flavor too dominant.

The open-face tart was another story. In this version, the single layer of olive oil crust nicely balanced the flavorful leek filling. Even better, the crust held its integrity and remained crispy even after it had been in the refrigerator for two days. This is not true of filo-wrapped pies; they rapidly lose their crispness after even a short time in the refrigerator.

So what will I do in the future? For a party, or any situation where pites are likely to be eaten quickly, I’ll stick with traditional filo. Nothing beats buttery-rich filo wrapped around leek and herb filling. I’ll also use filo when I’m not planning to bake all the pies at one time – unbaked filo-wrapped pies freeze well and can be popped in the oven direct from the freezer.

On days when I want Greek pie, but am in a hurry and don’t want to mess with filo, or when I want to limit the amount of fat I ingest, I’ll make an open-face tart. It’s an easy, extremely flavorful, savory treat. I’d happily serve it for any occasion, special or not.

Filo Tips – Working with Filo is Easy
First, pronunciation; in English, there are multiple ways to spell filo (fillo, fyllo, phyllo) because Greek to English isn’t transliterated consistently. But no matter the spelling, the pastry is pronounced FEE-low.

As with the ruined mess I faced on Friday, stuck together filo sheets are the bane of a cook’s existence. It is generally caused by improperly storing filo, by thawing and refreezing filo, or by leaving filo for too long at room temperature. To avoid this problem, buy from stores that sell a lot of filo. When you are ready to use it, thaw filo overnight in the refrigerator, bring it to room temperature before you start to work with it, and use the thawed filo within a week.

Finish making the filling, including cooling it, before you open the package of filo.

Filo is a lot more forgiving than it might seem. A few rips and tears don’t make any difference at all, and usually disappear in the many layers of filo or when a pie is shaped or rolled.

Dried out filo breaks apart and makes working with it difficult to impossible. Once filo is removed from the package, you either must work very quickly or must cover the filo sheets with a slightly damp cloth. The first few times you work with filo, the damp cloth is a must. As you gain confidence, you’ll be able to work quickly enough that the damp cloth is unnecessary.

If you want to make your own filo, Peter Minakis explains how
here.

If you want to see how filo is traditionally made in Greece, Maria Verivaki has a video and explanation here.

PrasopitaRecipe for Greek Leek Pie – Prasopita (Πρασόπιτα)
Makes 10 large or 20 small filo-wrapped pastries or 1 10” free-form tart
For vegans or those who are fasting, leave out the feta and eggs, and brush the filo sheets only with olive oil. Freeze extra Prasopites and bake frozen, adding 5 – 10 minutes to the baking time.

Leek Filling:
3 cups diced leeks, white and light green parts only, 1/2” dice (3 medium leeks)
1 1/2 cups diced yellow onions, 1/2” dice
3 Tbsp. olive oil
Salt
Freshly ground black pepper
1 1/2 cups sliced green onions (1 bunch)
1 Tbsp. minced garlic
1/2 cup minced fresh dill
1/2 cup minced fresh parsley
1 cup crumbled feta
2 eggs

Filo:
1 pound box of filo (18” x 14”)
1/2 cup (1 stick) butter
1/4 cup olive oil

Make the Filling: Sauté the leeks and onions, lightly seasoned with salt and freshly ground black pepper, in olive oil until the onions soften and start to turn golden. Put in a bowl and mix with all the remaining filling ingredients, except the eggs. Taste and add salt or freshly ground black pepper, as needed. Stir in the eggs.

Preheat the oven to 400°F.

Clarify the butter (see NOTE below for why and how to clarify butter). Mix the clarified butter and olive oil, and brush a rimmed baking sheet with the mixture.

Rolling Filo for PitaAlternative 1 - Shaping Large Prasopita: Remove the filo from the box, unroll it, and cover any you are not actively using with plastic wrap or a slightly damp cloth. Lay one 18” x 14” sheet of filo out on the counter and brush it lightly with butter-oil. Cover with another sheet of filo and brush it lightly with butter-oil. Spread 1/2 cup of filling along one of filo’s short edges. Fold in the sides and roll up the filo. Place roll on the prepared baking sheet seam side down and brush lightly with butter-oil. Repeat until all the pastries are rolled.

Alternative 2 – Shaping Small Prasopita: Follow the directions for shaping large Prasopita, but use 9” x 14” filo sheets or cut 18” x 14” filo sheets in half and use 1/4 cup filling.

Open-Face Leek TartAlternative 3 – Make Open-Face, Free-Form Tart: In a food processor mix 2 cups flour, 6 Tbsp. olive oil, and 1/2 tsp. salt. Mix in as much water as necessary (4 – 6 Tbsp.) to make dough that sticks together. Form into a ball and let rest at room temperature for 30 minutes. Roll out the dough into a 12” circle, place on a baking sheet, and spread the filling out on the dough, leaving a border of 1 1/2”. Sprinkle a little freshly grated parmesan cheese over the filling. Fold up the edges, sealing with water as necessary for folds in the dough to stick together.

Place the Prasopites (or tart) in the oven and bake for 30 – 40 minutes, or until the filo is brown and crispy (or the tart pastry is set and lightly browned).

Serve immediately.

NOTE: Clarified butter is butter with the milk solids removed. To clarify butter, melt it in a saucepan or microwave and skim off and discard the white foam that rises to the top. Pour the clear yellow butter into a bowl, being careful to keep the milky liquid that sinks to the bottom of the pan out of the clarified butter. Discard the milky liquid. If you don’t clarify butter used for separating layers of filo, the pastry won’t cook correctly, and will be soggy rather than crisp.

UPDATE: Maria Verivaki recently made this Prasopita, and shaped it into one large sprial pie (called Strifti - Στριφτή - in Greek). Here's Maria's post about Prasopita Strifti.
~~~~~~~~~~~~~~~~~~~~~~~~
More Leek Recipes:
Beet, Fennel, and Leek Salad with Lemon-Ginger Dressing (Παντζάρια, Μάραθο και Πράσο Σαλάτα με Πιπερόριζα Σάλτσα) (I make a winter salad and spice it up with ginger salad dressing)
Leek Pilaf (Πρασόρυζο) (I make Greek leeks with rice.)
Leek Soufflé
Leek and Tomato Crumble
The Easiest Grilled Leeks Ever

~~~~~~~~~~~~~~~~~~~~~~~~
This is my entry for
Weekend Herb Blogging, hosted this week by its creator Kalyn of Kalyn’s Kitchen.

Saturday, March 29, 2008

Recipe: Pistachio Biscotti (Παξιμαδάκια με Φιστίκια)

Pistachio Biscotti are light, crunchy, and nutty. They’re simple to make and taste wonderful. They’re a great way to use extra egg whites and are low fat. What more can you ask of a cookie?

Last night I brought Pistachio Biscotti to Antonia’s birthday party. More than one person took seconds; the ultimate complement. I wish I had one right now. It’d be the perfect breakfast.

I ferried raw pistachios back to Alaska after my r
ecent trip to Seattle, but in the absence of pistachios, almonds are a fine substitute. The egg whites were left from making a Piemontese homemade pasta specialty called tajarin.

This recipe is so good I might start making tajarin just so I’ll have enough leftover egg whites to make Pistachio Biscotti.

Pistachio Biscotti (Παξιμαδάκια με Φιστίκια)
Makes about 36 cookies.
Adapted from
Gourmet Magazine, April 1998
The slices are easier to cut when the meringue is fully cool after its first baking.

6 egg whites
1/8 tsp. salt
1 cup sugar
1 cup plus 2 Tbsp. flour
1 cup shelled raw (not roasted) pistachio nuts or blanched, slivered almonds
1 tsp. pure vanilla extract

Preheat oven to 350°F (325°F convection). Line the bottom and sides of a 9” x 9” baking pan with parchment paper.

In a large bowl, beat the egg whites and salt until they form soft peaks. Gradually beat in the sugar and continue to beat until the meringue holds stiff, glossy peaks. Quickly beat in the vanilla. Sift the flour over the meringue and evenly distribute the pistachios over the flour. Fold in the flour and pistachios gently but thoroughly.

Pour batter into the prepared baking pan and smooth out the top. Bake until the meringue is set and golden on top, about 25 - 30 minutes. Remove the pan from the oven, place it on a rack, and let cool for 15 minutes. Turn the baked meringue out onto the rack, carefully peel off parchment paper, and let cool completely.

Turn the oven down to 300°F (275°F convection).

Using a serrated knife, cut the baked meringue in half. Cut each half crosswise into 1/4-inch-thick slices. Arrange the slices about 1/2 inch apart on 2 baking sheets and bake, rotating the baking sheets halfway through, about 20 minutes total, or until the biscotti are pale golden and crisp. Turn off the oven, leave the cookies on the baking sheets and the oven door open, and let cool. Serve or store in an airtight container.

Thursday, March 27, 2008

Recipe: Parsnip Gnocchi with Pearl Onions, Peas, and Mushrooms

Last week I was rambling around the internet and came across a picture of “Parsnip Gnocchi and Chanterelles.” The photographer (Kevin) had enjoyed the dish, which also included peas and pearl onions, at Summit Restaurant in Colorado Springs. The concept captured my imagination.

Too bad there wasn’t a recipe. Even so, it looked possible to recreate using the picture as a guide.

Luckily, I had all the ingredients on hand. Parsnips and mushrooms came in my latest Full Circle Farm CSA box. The pantry held a bag of pearl onions; I’d bought too many for
Mushroom Stifado. A bag of peas from last summer’s garden was languishing in the freezer.

I immediately got to work making parsnip gnocchi. When the dish was done, it tasted as good as Kevin's picture looked. I’m already planning to make it again.

Parsnip Gnocchi with Peas, Pearl Onions, and MushroomsRoasted Parsnip Gnocchi with Pearl Onions, Peas, and Mushrooms
Serves 4 - 6
The gnocchi are surprisingly simple to make because, unlike some gnocchi recipes, this dough is easy to handle. Putting ridges in the gnocchi isn't necessary (and they're faster to make if you don’t). The ridges help gnocchi pick up flavors from the other ingredients, so I generally do it. No doubt the finished dish would taste better with wild mushrooms, but it tasted wonderful with the cremini I used. Pearl onions and mushrooms need to be sautéed in batches to ensure they brown properly; if you try to brown too many vegetables in a pot at one time, they’ll steam rather than brown. Because the vegetables are cooked and salted separately, be careful about how much salt you add to any individual vegetable or the finished dish may be too salty.

Parsnip Gnocchi:
2 pounds whole parsnips
2 Tbsp. olive oil
1 cup finely grated parmesan cheese
3/4 - 1 cup flour, plus extra for flouring surfaces

Vegetables:
2 cups pearl onions (1 pound) or 14 ounces frozen pearl onions, thawed
4 – 6 Tbsp. butter
2 cups sliced or quartered mushrooms
2 cups blanched and halved crosswise sugar snap peas
1/2 cup thinly sliced fresh basil or chopped fresh Italian parsley
2 tsp. minced garlic

Make the Gnocchi: Preheat the oven to 400°F. Wash and dry the parsnips. Rub them with olive oil and wrap them in aluminum foil. Roast for 30 – 40 minutes, or until they are easily pierced with a skewer or knife; the exact length of time depends on the parsnips’ size. Let cool, then skin the parsnips.

Purée the parsnips in a food processor. Mix in the parmesan and 3/4 cup flour. Dump the dough on a floured surface. Knead lightly, adding flour as necessary to prevent the dough from being sticky.

Parsnip Gnocchi
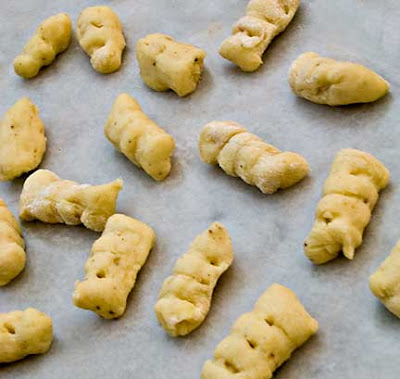
Divide the dough into 2” balls. Using your fingertips, roll out each ball on a floured surface into a long, 3/4” diameter, rope. Cut the rope into 3/4” pieces. To make ridged gnocchi, roll each piece of dough off the back of a fork, pressing lightly down as you roll. Put the finished gnocchi on a floured surface, in a single layer, while you cook the vegetables.

Cook the Vegetables: If starting with dried pearl onions, peel them and cut an X in the root end to help hold the onion layers together. An easy way to peel the onions is to drop them in boiling water for a minute and then slip off the peels.

Melt 2 Tbsp. butter over medium heat in a pan large enough to hold all the ingredients. Sauté half the pearl onions, lightly seasoned with salt and freshly ground black pepper, in the butter until the onions are well browned on all sides and cooked through. Be careful not to burn the butter; turn down the heat if necessary to prevent burning. Remove the browned onions from the pan with a slotted spoon and set aside. Repeat with the remaining pearl onions, adding butter as necessary.

In the same pan, sauté half the mushrooms, lightly seasoned with salt and freshly ground black pepper and adding butter as necessary, until they are well-browned on both sides. Remove the browned mushrooms from the pan with a slotted spoon, add to the onions, and set aside. Repeat with the remaining mushrooms, adding butter as necessary.

In the same pan, sauté the peas, lightly seasoned with salt and freshly ground black pepper, until they are almost, but not quite, done. Remove the peas from the pan with a slotted spoon and add to the other vegetables.

Finish the Gnocchi and Vegetables: Bring a large pot of salted water to a boil. Gently add half the gnocchi to the water and cook until the gnocchi float to the surface. When the gnocchi float, use a slotted spoon to remove them from the water and put them in the pan in which the vegetables cooked. Repeat with the remaining gnocchi.

Over medium heat, gently toss the gnocchi to lightly coat them with butter. Add the vegetables, basil, and garlic, and toss gently to combine. When all the vegetables are heated through, serve immediately.
~~~~~~~~~~~~~~~~~~~~~~~~

This is my entry for Grow Your Own, an event created and hosted by Andrea’s Recipes.

Tuesday, March 25, 2008

Recipes: Tajarin (Fresh Egg Yolk Tagliarini), Tajarin with White Truffles, Olive Oil, and Parmesan, & Tajarin with Sage Butter

Oregon White Truffle slicesThinly sliced Oregon white truffles

I'm celebrating my 100th article on Mediterranean Cooking in Alaska with white truffles, a food worthy of any special occasion.

The first time I had white truffles was in La Morra, a small town in the heart of Piemonte’s Barolo wine country. Their flavor was seductively good, amazingly good, good like nothing I’d savored before.

Ever since, I’ve had white truffles as often as possible; in other words, rarely. Fresh white truffles are few and far between.

We arrived at an agriturismo on the outskirts of La Morra on a sunny fall afternoon. To check into
Agriturismo Il Gelso, we sat at an outdoor stone table with then owner, Egidio Oberto. He welcomed us with glasses of excellent wine he’d made on-site. Basking in the autumn sun, our tired shoulders relaxed; the day of travelling already forgotten.

The wine whetted our appetites. Despite the early hour, we drove into La Morra looking for the Belvedere, a restaurant my father highly recommended. We parked, intending to roam the streets until we saw a Belvedere sign. When we got out of the car, we noticed the restaurant was directly across the street. That was a very good omen.

We opened the restaurant's door and discovered it was more formal than we’d thought. Despite the white tablecloths and old-world atmosphere, the staff couldn’t have been more welcoming. No reservation? Not a problem. Casually dressed? Come right in. We were comforably seated at a window table with a vineyard view.

The menu that evening featured white truffles (
Tuber magnatum) and porcini (Boletus edulis), two local delicacies that had just come into season. We ordered one or the other or both for every course.

One of my favorite dishes was tajarin tossed in butter and parmesan, over which our waitress showered a flurry of white truffle shavings. Tajarin is a thinly cut fresh pasta unique to Piemonte and made with large amounts of egg yolks.

By the end of the evening, we were intoxicated with white truffles. I remember vividly how happy we were on leaving the Belvedere for a post-dinner stroll around La Morra.

I also remember the truffles’ better-than-expected flavor. I doubt it's possible to eat my fill of fresh Piemontese white truffles, but we spent the rest of our time in the environs of La Morra trying.

Recently, we arrived at our friends' house for dinner and were excited to find Bill making risotto with Oregon white truffles. Cindy brought the truffles home from a trip to Portland.

I’d read about
Oregon white truffles, but this was the first time I’d tried them. They were smaller and much milder than their Italian cousins, but tasted distinctively and unmistakably of truffles. The risotto was a treat.

After dinner, as we bundled up to leave, Cindy generously gave us a handful of pungent Oregon truffles, carefully packed in dry Arborio rice. I lay in bed that night happily thinking about truffles.

Truffles, like mushrooms, are the annual fruit of underground fungi. The perennial part of truffles and mushrooms exists as a web of thread-like filaments in the soil called a mycelium.

In France and Italy, truffles have long been a gourmet treat. It’s only in recent years that commercial harvesters discovered
two varieties of white truffles (Tuber oregonense and Tuber gibbosum) growing in the Douglas fir forests that run up the Pacific coast from Northern California to British Columbia.

We learned at La Morra’s Belvedere that the heady, earthy taste of truffles shines when paired with simple pasta, rice, or egg dishes. Because their flavor dissipates under heat, truffles shouldn’t be cooked. They are best when shaved over food at the time of serving.

I decided to pair the Oregon truffles with tajarin, the Piemontese pasta we ate in La Morra. Luckily, there was a new carton of organic eggs in the refrigerator, so I could make the egg-rich dough.

While making dinner, I thought about the best way to cut the truffles thin enough to release their maximum flavor. I'd settled on a mandoline when I suddenly remembered we owned a
truffle shaver, unused since we’d received it for Christmas several years ago.

Truffles and Truffle ShaverI laughed at myself for owning a truffle shaver, but it was the precise tool needed. The truffle shaver worked perfectly on its inaugural appearance; I hope to put it to good use many times in the future.

Or so I’m dreaming.

NOTE: The Belvedere closed this year. Its owners, the Bovio family, will soon open a new restaurant just outside La Morra called
Bovio Ristorante.

Tajarin, Piemontese Pasta
Tajarin (Fresh Egg Yolk Tagliarini)
Makes enough pasta for 4 servings
Tajarin made with a food processor and pasta machine is quite easy. If you use farm fresh eggs, with their deep yellow yolks, the tajarin will have better flavor and more pronounced color. Use the extra egg whites to make Pistachio Biscotti.

2 cups all purpose flour
1/2 tsp. salt
2 whole eggs
6 egg yolks

Put all the ingredients in a food processor. Process until the ingredients are thoroughly mixed and the dough starts forming clumps. Dump the dough out onto a floured surface and knead for 1 minute, adding a small amount of flour if the dough is sticky. When you’re done, the dough should be smooth and firm. Divide the dough into three portions, cover with plastic wrap, and let sit at room temperature for one hour. (Dough can be made ahead to this point.)

Run each portion of dough through the rollers of a pasta machine, starting with the thickest setting. Lightly dust the pasta dough with flour so it runs smoothly through the rollers. Fold the dough in thirds as if folding a letter, turn it 45 degrees, and again run it through the thickest setting. Repeat the folding, turning, and rolling at least three more times, or until the dough is smooth and shiny.

Set the pasta machine at the next thinnest setting. Run the sheet of pasta through, dusting with flour as necessary. Continue reducing the setting of the pasta machine and running the pasta through until you reach the machine’s second lowest setting. When the sheets of pasta become too long to comfortably handle, cut them into manageable lengths. When each sheet is done, lay it out to rest on a floured surface for 30 minutes.

Using the small (2mm) cutter on the pasta machine, cut the pasta into long lengths. Lay out the cut pasta on a floured cloth, or shape it into loose nests. Let dry for 30 – 60 minutes.

The tajarin is now ready to use.

Tajarin and TrufflesTajarin with White Truffles, Olive Oil, and Parmesan
Serves 4
If you don’t have access to fresh truffles, use white truffle oil instead. Be careful not to overdo; a little truffle oil goes a long ways.

Pasta:
1 recipe Tajarin (see above)
2 Tbsp. coarse salt

Sauce:
2 – 4 Tbsp. extra virgin olive oil
Salt
Freshly ground black pepper
6 Tbsp. freshly grated Parmigiano-Reggiano cheese
Freshly shaved white truffles or white truffle oil

Fill a large pot with water, bring it to a boil, add the salt, and stir in the pasta. Cook for 1 minute. Drain.

Return the pasta to the pan, toss with 2 Tbsp. olive oil, salt, freshly ground black pepper, and 2 Tbsp. parmesan. If the pasta is too dry, add the remaining olive oil. Divide the pasta between four serving plates; top each plate with 1 Tbsp. parmesan. Shave truffles over the pasta (or drizzle with a small amount of truffle oil) and serve immediately.

Tajarin with Sage Butter
Serves 4
To perfect the tajarin recipe, I had to make it several times. This is the simplest and most recent version. Be sure to use good butter and fresh sage leaves; in a dish with so few ingredients, their quality matters.

Pasta:
1 recipe Tajarin (see above)
2 Tbsp. coarse salt

Sauce:
4 Tbsp. butter
2 Tbsp. minced sage
Salt
Freshly ground black pepper
6 Tbsp. freshly grated Parmigiano-Reggiano cheese

Melt the butter over low heat, stir in the sage, and season lightly with salt and freshly ground black pepper.

Fill a large pot with water, bring it to a boil, add the salt, and stir in the pasta. Cook for 1 minute. Drain.

Return the pasta to the pan, toss with the sage butter and 2 Tbsp. parmesan. Divide the pasta between four serving plates; top each plate with 1 Tbsp. parmesan. Serve immediately.

~~~~~~~~~~~~~~~~~~~~~~~~~~
Thie is my entry for the Second Annual Pullet Surprise: Eggs hosted by Peanut Butter Etoufee.

Monday, March 24, 2008

Recipes: Mushroom Stifado & Mushroom, Pancetta, and Feta Stifado (Μανιτάρια Στιφάδο & Μανιτάρια, Ιταλική Πανσέτα, και Φέτα Στιφάδο)

Nature’s seasons and religious fasting periods profoundly influence what our Greek village relatives eat for dinner.

Many are farmers, relying on the fruits (and vegetables) of their labors for sustenance. Most supplement their diets with wild greens and snails, mushrooms and sea urchins, rabbits and octopus. All generously share abundant seasonal harvests with friends and neighbors.


To honor Orthodox teachings, religious Greeks follow a near-vegan diet (certain seafoods are allowed) on most Wednesdays and Fridays throughout the year. Greeks also fast during Great Lent (starting seven weeks before Orthodox Easter), Christmas Lent, and the first 15 days of August. On many fasting days, the truly devout don’t use olive oil or alcoholic beverages.

This year Great Lent began on March 10, and followed a week during which meat was prohibited but dairy, eggs, and fish were allowed. The fasting structure is complex enough that
most people use a church calendar to determine the precise nature of the fast required on any given day.

The first day of Great Lent is called Clean Monday (Καθαρά Δευτέρα in Greek), and marks the end of Carnival indulgence (called Apokreas - Απόκριες in Greek). This year, Clean Monday was on March 10. It's a national holiday; the highways are full of urban Greeks leaving the city for a breath of country air.


Island families celebrate the day with a picnic of what's best and freshest from the fields and sea. Sea urchins, full of delicious roe in spring, are a favorite Clean Monday treat and are hand-gathered by the gunnysackful.

One year on the island, the confluence of perfect rains and temperature brought forth an unexpected bounty, just in time for Clean Monday. My husband returned home from surveying a mountain pasture with a big bag of horse mushrooms. After vetting their edibility with a knowledgeable aunt (the primary rule of wild mushroom gathering is “when in doubt, throw it out”), I constructed a hearty stew using this tasty treasure.


We are now well into Easter Lent for 2008. Mushroom Stifado is ideal Lenten fare: a hearty, vegan main course. For omnivores who aren't fasting, pancetta and feta add wonderful flavor to the stew. Recipes for Mushroom Stifado and the variation, Mushroom, Pancetta, and Feta Stifado, are set out below.

Mushroom StifadoMushroom Stifado (Μανιτάρια Στιφάδο)
Serves 4 - 6
Mushroom Stifado tastes best when made with wild mushrooms or a mixture of cultivated cremini, oyster, and shiitake mushrooms. Even when made with a single type of mushroom, this hearty stew is wonderful. Serve it as an appetizer, over pasta tossed with garlic and olive oil, or with roasted potatoes. Leftovers, chopped and mixed with stock, make a flavorful soup.

2 cups pearl onions (1 pound) or 14-ounces frozen pearl onions, thawed
2 - 6 Tbsp. olive oil
6 cups mushrooms, cleaned, trimmed, and cut in 1” chunks (1 1/2 pounds)
2 cups diced yellow onions, 1/2” dice
2 Tbsp. minced garlic
1 tsp. Aleppo pepper or 1/2 tsp. crushed red pepper (optional)
1 cup red wine
1 15-ounce can diced tomatoes or 2 cups fresh, with juices
1 Tbsp. minced rosemary
2 Tbsp. red wine vinegar
2 tsp. sugar

If starting with dried pearl onions, peel them and cut an X in the root end to help hold the onion layers together. An easy way to peel pearl onions is to drop them in boiling water for a minute and then slip off the peels.

Sauté the peeled (or thawed) pearl onions, lightly seasoned with freshly ground black pepper, in 2 Tbsp. olive oil until the onions are well browned on all sides and cooked through. Remove the browned onions from the pan with a slotted spoon and set aside.

Sauté the mushrooms, lightly seasoned with freshly ground black pepper, in the oil from the onions until they are well browned on all sides, adding olive oil as necessary. Scrape up any browned bits from the bottom of the pan. Remove the browned mushrooms from the pan with a slotted spoon and set aside.

Sauté the diced onions, lightly seasoned with freshly ground black pepper, in the same oil until they soften and begin to turn golden, adding olive oil as necessary. Scrape up any browned bits from the bottom of the pan. Stir in the garlic and Aleppo pepper, and cook for one minute. Stir in the wine and cook until reduced by half. Stir in the tomatoes, rosemary, vinegar, and sugar. Bring to a boil, cover, reduce heat to low, and simmer for 15 minutes. Stir in the browned mushrooms and simmer for 15 minutes. Stir in the browned pearl onions and simmer for 5 minutes. Serve immediately.


Mushroom-Pancetta Stifado with Feta (Μανιτάρια, Ιταλική Πανσέτα, και Φέτα Στιφάδο)
Serves 4 - 6

As with vegan Mushroom Stifado, this tastes best when made with wild mushrooms or a mixture of cultivated cremini, oyster, and shiitake mushrooms. I prefer using pancetta that has been cut in 1/4” slices and then diced, so I buy it directly from the deli counter where I can direct the pancetta's thickness, rather than in pre-cut packages of too-thin slices. The chopped leftovers, with the addition of stock, make a flavorful soup.

2 cups pearl onions (1 pound) or 14-ounces frozen pearl onions, thawed
2 cups diced pancetta or bacon, 1/4” dice (1/2 pound)
6 cups mushrooms, cut in 1” chunks (1 1/2 pounds)
2 cups diced yellow onions, 1/2” dice

2 Tbsp. olive oil (optional)
2 Tbsp. minced garlic
1 tsp. Aleppo pepper or 1/2 tsp. crushed red pepper (optional)
1 cup red wine
1 15-ounce can diced tomatoes or 2 cups fresh, with juices
1 Tbsp. minced rosemary
2 Tbsp. red wine vinegar
2 tsp. sugar
1 cup crumbled feta

If starting with dried pearl onions, peel them and cut an X in the root end to help hold the onion layers together. An easy way to peel pearl onions is to drop them in boiling water for a minute and slip off the peels.

Cook the pancetta over medium heat until the fat has rendered. Remove the cooked pancetta from the pan with a slotted spoon and drain it on paper towels.

Sauté the peeled (or thawed) pearl onions, lightly seasoned with freshly ground black pepper, in the rendered pancetta fat until the onions are well browned on all sides and cooked through. Remove the browned onions from the pan with a slotted spoon and set aside.

Sauté the mushrooms, lightly seasoned with freshly ground black pepper, in the rendered pancetta fat until they are well browned on all sides. Scrape up any browned bits from the bottom of the pan. Remove the browned mushrooms from the pan with a slotted spoon and set aside.

Sauté the diced onions, lightly seasoned with freshly ground black pepper, in the rendered pancetta fat until they soften and begin to turn golden (add olive oil if necessary). Scrape up any browned bits from the bottom of the pan. Stir in the garlic and Aleppo pepper, and cook for one minute. Stir in the wine and cook until reduced by half. Stir in the tomatoes, rosemary, vinegar, sugar, and reserved pancetta. Bring to a boil, cover, reduce heat to low, and simmer for 15 minutes. Stir in the browned mushrooms and simmer for 15 minutes. Stir in the browned pearl onions and simmer for 5 minutes.

Stir in the crumbled feta. Serve immediately with hilopites, pasta, or roasted potatoes that have been tossed with olive oil, minced garlic, salt, and pepper.

~~~~~~~~~~~~~~~~~~~~~~~

This is my entry for Weekend Herb Blogging, hosted this week by Ramona from The Houndstooth Gourmet.

Sunday, March 23, 2008

Recipe: Beet and Red Pepper Salad (Παντζάρια Σαλάτα με Κόκκινες Πιπεριές)


Beet and Red Pepper Salad tastes really good. It’s easy to make and looks beautiful on the plate. Try it with feta cheese and olives for a light lunch or savory appetizer.


Beet and Red Pepper SaladBeet and Red Pepper Salad (Παντζάρια Σαλάτα με Κόκκινες Πιπεριές)
Serves 4


Mediterranean Cooking in Alaska has moved as of March 2011. To read this post please go to


http://www.laurieconstantino.com/beet-red-pepper-salad/


Please click on over and visit my new site. Thank you!


Thursday, March 20, 2008

Recipes: Red Pepper Soup & Pizzettes (Σούπα με Κόκκινες Πιπεριές & Πιτσάκια)

My first cookbooks were homemade, full of hand-written recipes and clippings from newspapers and magazines. Because I lived on next to nothing, I glued the recipes on old pages of notes I’d taken in classes that had ended.

In those days, before the internet, interesting food writing was hard to find. Now it’s easy. It seems as if new food blogs pop up every day. The challenge is sorting the wheat from the chaff in the abundance of online recipes.

Jenn of
The Leftover Queen has made it easier to investigate the multitude of food blogs by maintaining a comprehensive listing of them. In addition, Jenn writes an article on The Leftover Queen every Friday highlighting some of her favorite blogs.

Another way to learn about new blogs is an event called
Taste and Create organized by For the Love of Food. In this event, food writers are paired with a randomly assigned partner, and asked to cook and review one recipe from their partner’s blog.

This month I was paired with
Tart Reform, a blog written by a smart woman who is thrilled about starting law school in the fall. The name of her blog is a clever play on the phrase “tort reform,” a political effort undertaken by insurance companies and major corporations to deny full compensation to those who are injured by another’s negligence.

Tart Reform includes many dessert recipes; the author is a dedicated baker. I rarely make desserts anymore, the result of marrying a man who doesn’t like sweets. Since I inherited a sweet tooth from my father, when I make desserts they end up in my belly or, more accurately, on my belly. Sadly, it’s better for me to admire Tart Reform’s lovely desserts than to make them.

Instead, I made
Red Pepper Soup, a recipe posted on Tart Reform’s blog last July. I’d originally thought of following Tart Reform’s lead and making the soup with green peppers for a festive St. Patrick’s Day soup. However, Tart Reform warned strongly against doing so, and said the soup “looks just like the goo from Ghostbusters” when made with green peppers. Not interested in having a Ghostbusters’ prop for dinner, I stuck with red peppers.

Red Pepper Soup, originally published in a
New York Times article by Marian Burros, was quick and easy because it doesn’t require pre-roasting or peeling the peppers. With a bag of Costco red peppers (in Alaska, $6.50 for 6 peppers), the recipe made a reasonably priced dinner for 4.

The soup is delicious and beautiful. A small amount of crushed red pepper flakes and minced thyme highlight its sweet red pepper flavor.

The peppers aren’t peeled, so bits of pepper skin remain in the soup after it is puréed. The original recipe left in the skins, but I didn’t like the soup's texture with them in it. It took 2 minutes to strain them out, leaving the soup with a pleasingly silky texture.

The original recipe suggests serving the soup with a dollop of crème fraiche and sprigs of thyme. Although we tried this suggestion and it tasted fine, we preferred the soup with a drizzle of best quality olive oil and a sprinkling of minced thyme.

I served the soup with
Pizzettes, another recipe from Tart Reform’s site. Pizzettes are nothing more than mini-pizzas; the original recipe came from Giada’s Family Dinners by Giada De Laurentiis.

I made the Pizzettes twice; once with gorgonzola as Giada called for and the second time with mozzarella, which was Tart Reform’s recommendation. We preferred mozzarella Pizzettes, although the ones with gorgonzola were also tasty.

Pizzettes are easy to make, even with putting together my own pizza dough (the original recipe used store bought). The concept is one I will use again; pizzettes make a terrific appetizer. They tasted great hot, and retained their flavor at room temperature, so could easily be made ahead for entertaining.


Red Pepper Soup (Σούπα με Κόκκινες Πιπεριές)
Serves 4
Adapted from Marion Burros,
New York Times (September 21, 2005) via Tart Reform
The amount of red pepper depends on how spicy you like your soup and the heat of your dried red peppers. When I first read the recipe, I was concerned 1 cup of liquid wouldn’t be enough, but I shouldn’t have worried. There is plenty of liquid because peppers are full of moisture and the soup is cooked covered. If you don’t mind pepper skins, there’s no need to strain the soup. Red Pepper Soup may be served hot or cold, and may be frozen for later use.


2 cups sliced onions
2 tablespoons olive oil
Salt
Freshly ground black pepper
1 Tbsp. chopped garlic
1/4 - 1/2 tsp. crushed red pepper flakes
1/4 cup dry white wine
6 large red bell peppers, stemmed, seeded and cut in 1” chunks
1 cup vegetable or chicken stock
4 tsp. minced fresh thyme, plus extra for garnish
Crème fraîche or sour cream, for garnish (optional) OR
Best quality extra virgin olive oil, for drizzling (optional)

Sauté the onion, lightly seasoned with salt and freshly ground black pepper, in olive oil until the onions soften and start to turn golden. Stir in the garlic and red pepper flakes and cook for 1 minute. Add the wine and boil until only 1 Tbsp. liquid remains.

Stir in the peppers, stock, and thyme, and lightly season with salt and freshly ground black pepper. Bring the liquid to a boil, cover, turn down the heat and simmer for 30 – 40 minutes, or until the peppers are tender

Using a stick blender, blender, or food processor, purée the soup until it's smooth. Strain the soup with a Foley food mill or strainer to remove the tough pieces of pepper skin. Taste and add salt or freshly ground black pepper, as needed.

Ladle the soup into bowls and garnish with extra virgin olive oil, crème fraiche, or sour cream. Sprinkle with minced thyme and serve immediately.

Variation: Drizzle with a blender pesto of 2 Tbsp. fresh thyme, 2 large cloves garlic, 1/4 tsp. salt, and 1/4 cup olive oil. This is good drizzled directly into the soup, and is particularly attractive (and tasty) when used in combination with crème fraîche.

PizzettesPizzettes (Πιτσάκια)
Makes 40 2 1/4” mini-pizzas
Adapted from Giada’s Family Dinners (Crown Publishing Group 2006) via
Tart Reform
Pizzettes are pizza dough cut into small circles and baked with a topping. I indented the dough before adding the toppings so they would stay on the pizzettes when the dough expands during baking. The oil is necessary at the end to bring out the full flavor of fresh basil. When I tried a basil topping without oil, the basil lost much of its flavor (the volatile oils dissipated when the cut basil hit the hot pizzettes). As with pizza, the topping for pizzettes is limited only by one’s imagination.

Dough:
1 cup warm water
1/2 tsp. sugar
1 tsp. yeast
2 – 2 1/2 cups all purpose flour
1 tsp. salt

Topping:
1/4 tsp. crushed red pepper flakes
1 1/2 cups shredded mozzarella
1 1/2 cups seeded and diced tomatoes, 1/2” dice
1/4 cup shredded fresh basil (basil chiffonade)
2 – 3 Tbsp. extra virgin olive oil
Salt

Make the Dough: Mix the water, sugar, and yeast in the bowl of a stand mixer. Let sit for 10 minutes. Using the mixer’s paddle attachment (or by hand), stir in the salt and enough flour to form a soft dough. Switch to the dough hook attachment. Knead on low speed for 5 minutes (or by hand), adding flour as necessary to prevent the dough from sticking to the bowl. Put the dough in an oiled bowl, cover with plastic wrap fixed to the bowl with a rubber band, cover with a dish towel, and let rise until doubled in size.

Make the Pizzettes: Preheat the oven to 425°F.

Roll out the dough until it is 1/4” thick. Using a 2” – 2 1/2” round cutter, cut out as many circles as you can and place 3/4” apart on parchment paper-lined baking sheets. Gather the remaining dough together, roll it out, and cut into circles. Use a glass (or other circular object) slightly smaller than the dough circles to indent their centers.

Sprinkle the dough rounds with crushed red pepper flakes, top with shredded mozzarella, and then with diced tomatoes. Bake for 10 – 12 minutes or until the cheese melts and starts to turn golden. If baking two sheets of pizzettes at one time, rotate the baking sheets after they've been in the oven 5 minutes.

While the pizzettes are baking, mix the basil and olive oil. As soon as the pizzettes come out of the oven, top each one with a little basil and olive oil. Sprinkle lightly with salt, and serve immediately.

Tuesday, March 18, 2008

Recipe: Thyme-Braised Lentils with Petimezi and Pan-Fried Salmon (Φακές με Πετιμέζι και Σολομός στο Tηγάνι)

My name is Laurie and I’m an ingredient junkie.

I’m hopelessly attracted to unusual food items. Some people like to shop for shoes, others for jewelry, and others for tools. For me, the only shopping I truly enjoy is for ingredients.

When we go on vacation, visiting local grocery stores is always one of the highlights. I wander the aisles, my eyes scanning the shelves, and my heart skipping a beat when I find interesting regional specialties.

After a trip to
Nashville, I came home with White Lily soft wheat flour. In Victoria B.C., locally made blackberry port took pride of place in my luggage. On our last trip to Italy, truffle cheese and Castelluccio lentils from Norcia in Umbria were my favorite purchases.

My family feeds this addiction on birthdays and holidays. Aged balsamic, specialty salts, salumi, and imported cheeses are some of the presents that helped expand my gastronomic horizons.

My sister-in-law recently sent a bottle of
Italian saba. It was labeled as “saba dressing” and “condimento alimentare balsamico agrodolce.” I understood this to mean the bottle contained some kind of sweet and sour dressing, but exactly what it was, I had no idea. It was the perfect present: an ingredient I’d never heard of and had no idea how to use.

When I shook the packaging, I was relieved to find a multilingual descriptive pamphlet, with recipes. I learned saba is grape must syrup and, according to the manufacturer, was popular with early Greeks and Romans. Aha. My mind clicked into gear. Saba is the Italian equivalent of
petimezi, Greek grape must syrup and a specialty of the island where we have a home.

I took out a jar of petimezi and tasted it side by side with saba. Both have the consistency of light maple syrup, and both are made exclusively with grape must. Their flavors differ slightly: saba is a little sweeter than island petimezi, which is sweet, but with a welcome hint of subtle bitterness.

On the island, petimezi is traditionally served with homemade noodles or used to make cookies, cakes, puddings, and preserves. Sometimes it is eaten with yogurt in lieu of honey. All these dishes highlight petimezi’s sweetness.

The pamphlet recommended using saba with onions, beans, meat, or vegetables, in addition to sweets. My mind started racing with possibilities for using petimezi in savory foods. I’ll investigate this intriguing concept when next we’re on the island to find out whether there are any traditional savory uses of petimezi.

In the meantime, I’ve been experimenting with saba and petimezi; the two ingredients are interchangeable. One of my most successful experiments was adding must syrup to braised lentils, a dish I like serving with salmon. The syrup’s sweet and tart flavors provide a lovely contrast to oil-rich salmon.

Salmon and LentilsThyme-Braised Lentils with Petimezi and Pan-Fried Salmon (Φακές με Πετιμέζι και Σολομός στο Tηγάνι)
Serves 4

For the vast majority of people who don’t have grape must syrup in their pantries, thyme or other strong-flavored honey can be successfully substituted. The recipe calls for salmon fillets, which I prefer serving when entertaining. But my favorite bits of salmon, shown in the photograph, are the trimmings left after filleting a whole salmon. The flesh close to the bone is full of flavor and, because the small pieces cook quickly, remains moist and juicy. For anyone with access to whole fish, this is a wonderful way to use up parts of the fish that are too often thrown in the garbage. If you have leftover lentils, add vegetable or chicken stock to make a wonderfully flavorful soup.

12 ounce salmon fillet
Salt
Freshly ground black pepper
1 1/4 cup lentils, preferably beluga or Puy
1 cup diced shallots, 1/4” dice
1/2 cup diced carrots, 1/4” dice
1/2 cup diced celery, 1/4” dice
3 Tbsp. olive oil, divided
3 Tbsp. minced thyme
1 cup dry red wine
1 1/2 cups vegetable or chicken stock
2 Tbsp. petimezi or saba, or 2 tsp. thyme honey
1/4 cup minced parsley

Wash the salmon and dry it well. Using needle-nosed pliers, remove as many pin-bones from the fillet as possible. Skin the fish, if necessary, and cut it into 4 even pieces. Lightly season the salmon on both sides with salt and freshly ground black pepper.

Bring a pot of salted water to a boil. Stir in the lentils and cook for 15 – 20 minutes, or just until the lentils soften, but are not cooked all the way through. Drain and reserve.

Sauté the shallots, carrots, and celery, lightly seasoned with salt and freshly ground black pepper, in 2 Tbsp. olive oil until the shallots soften and begin to turn golden. Stir in the thyme and red wine and cook, stirring, until the wine is almost absorbed. Stir in the stock and petimezi, saba, or honey, bring to a boil, reduce the heat, and simmer 20 – 30 minutes, or until the lentils are tender, but not mushy.

Heat the remaining 1 Tbsp. olive oil in a pan until it is hot, but not smoking. Turn the heat to medium high, and add the salmon. Cook for 3 – 5 minutes, or until the pan side of the salmon is lightly browned. Turn over and cook for 1 - 3 minutes, or until the salmon is done to your taste. The exact length of cooking time depends on the thickness of the fillet; keep in mind that salmon tastes better slightly underdone than it does when it's overdone. (If you’re using salmon trimmings, the fish cooks in 2 minutes total.)

To serve, put some lentils on a plate, top with the salmon, and sprinkle with minced parsley. Dried black olives and crusty bread are terrific accompaniments.

~~~~~~~~~~~~~~~~~~~~~~~~~

This is my entry for Heart of the Matter #13 Party Food, a collection of heart-healthy recipes, organized by Joanna of Joanna's Food, Michelle of The Accidental Scientist, and Ilva of Lucullian Delights.

Monday, March 17, 2008

Recipe: Falafel (Φαλάφελ ή Ρεβυθοκεφτέδες)

Falafel almost whipped me, but I prevailed in the end.

My friend Salwa, a Christian Palestinian, gave me her recipe ages ago, when I first started working on the book that became
Tastes Like Home: Mediterranean Cooking in Alaska (a fundraiser for Alaska’s only Greek Orthodox Church). She made the recipe sound simple. Initially, it wasn’t.

The first few times I made falafel were miserable failures. Because I couldn’t get them right before the book went to print, Tastes Like Home doesn’t include a falafel recipe.

After re-consulting Salwa and reviewing other recipes for this wonderful Middle Eastern treat, I finally had my Eureka moment and figured out how to make great tasting falafel every time. Trust me; if you follow the directions, falafel are simple.

For those who’ve never eaten them, falafels are crispy fried chickpea or bean croquettes, seasoned with herbs, cumin, and coriander seeds. Salwa serves hers with tahini sauce and tomato-onion salad. Falafels are delicious either on their own or in a pita sandwich.

Falafel and TabboulehFalafel (Φαλάφελ ή Ρεβυθοκεφτέδες)

Makes 25-30 small patties (serves 4 as a main course)
Adapted from Salwa Abuamsha’s recipe
To make good falafel there are four important rules: 1. Don't use canned chickpeas. 2.


Mediterranean Cooking in Alaska has moved as of March 2011. To read this post please go to


http://www.laurieconstantino.com/how-to-make-perfect-falafel/


Please click on over and visit my new site. Thank you!


Saturday, March 15, 2008

Recipe: Artichoke and Swiss Chard Gratin (Αγγινάρες και Χόρτα στο Φούρνο)

Work-related travel may be necessary, but it’s far from fun.

Hotels rooms blur together in a cloud of mediocre sameness. Long meetings in new time zones keep life off-kilter and make it extraordinarily difficult to explore the terrain.

I’ve worked in jobs where too much business travel was unavoidable. For self-preservation, I began introducing an element of pleasure into each dreary trip by finding an exciting restaurant to visit.

In Boston, this is how I discovered Hamersley’s Bistro. Hamersley’s has one of those menus where you want to order everything. The chef specializes in imaginative preparations of seasonally fresh vegetables.

I ignored the entrees and ordered a mixture of appetizers and vegetable side dishes. I ate slowly, savoring each bite, and left the restaurant invigorated and momentarily happy for the chance to travel, even on business.


Shortly after I first ate at Hamersley’s, its owner, Gordon Hamersley, published a cookbook,
Bistro Cooking at Home. I bought it immediately, and was glad I did. Although they have complex flavors, Hamersley’s dishes are easy to make, use readily available ingredients, and are consistently delicious.

Last night I made a version of Hamersley’s Artichoke and Swiss Chard Gratin. The gratin’s cream, which I rarely use, blends nicely with the vegetables’ earthy flavors to form a delicious sauce.

Hamersley makes his gratin with fresh artichokes. I substituted frozen artichoke quarters. Using fresh artichokes just for the hearts requires too much time and effort (and costs too much) for a mid-week meal. I'd rather save fresh artichokes for uses that let me enjoy the delicious leaves, which too often are tossed when fresh artichokes are used for their hearts.

Artichoke and Swiss Chard GratinArtichoke and Swiss Chard Gratin (Αγγινάρες και Χόρτα στο Φούρνο)
Serves 4 – 6
Adapted from Bistro Cooking at Home by Gordon Hamersley (Broadway Books 2003)
Spinach, nettles, poppies, or other mild-flavored greens may be substituted for the Swiss chard. Salting vegetables as they cook brings out their flavor in a way that salting only at the end can’t achieve. For this reason, small amounts of salt are added as each vegetable cooks; be careful not to fully salt each ingredient or the finished gratin will be too salty.

5 – 6 whole Swiss chard leaves (1 bunch), or any other mild-flavored greens, wild or domestic
12 ounces frozen artichoke quarters, thawed
3 Tbsp. olive oil, divided
Salt
Freshly ground black pepper
3 cups thinly sliced yellow onion
1 Tbsp. minced garlic
1 Tbsp. minced fresh thyme
1 cup heavy cream
1/2 cup grated parmesan cheese

Preheat the oven to 375°F.

Wash the chard leaves and shake off the excess water (do not dry). Separate the leaves from the stems. Cut the stems into 1/2” dice and roughly chop the leaves; keep the stems and leaves separate.

Sauté the thawed artichoke quarters, lightly seasoned with salt and freshly ground black pepper, in 1 Tbsp. olive oil until they are lightly browned. Place the artichokes in a large bowl.

In the same pan, sauté the onions, lightly seasoned with salt and freshly ground black pepper, in 1 Tbsp. olive oil until the onions soften and start to turn golden. Stir in the garlic and fresh thyme and cook for 1 minute. Add the onions to the bowl with the artichoke hearts.

In the same pan, sauté the Swiss chard stems, lightly seasoned with salt and freshly ground black pepper, in 1 Tbsp. olive oil for 5 minutes. Stir in the leaves, and cook until the stems and leaves are tender and any liquid in the pan has evaporated. Add the chard to the bowl with the other ingredients and toss to combine.

Oil a 9” x 9” baking pan (or 10” x 10” pan or 1 1/2 quart gratin dish). Spread the vegetables in the pan, pour the cream evenly over, and top with the grated parmesan cheese. Bake for 30 minutes. Raise the heat to 425°F and bake for 8 – 10 minutes, or until the cheese topping is nicely browned. Serve immediately.
~~~~~~~~~~~~~~~~~~~~~~~~~~~~~~

This is my entry for Antioxidant Rich Food/5-a-Day Tuesday created and hosted by Sweetnicks.

Friday, March 14, 2008

Recipes: Santorini Fava Pie with Tomatoes, Capers, and Eggs & Fava Pantremeni (Σαντορίνη Φάβα Πίτες με Ντομάτες, Κάπαρης και Αυγά & Φάβα Παντρεμένη)

Let’s clear up the linguistic confusion first.

In English, fava refers to Vicia faba, large beans in long green pods that are also known as broad beans or horse beans in English (in Greek, they're called koukia). This article is not about Vicia faba.

Today I’m writing about
Greek fava, Lathyrus clymenum L., a variety of yellow split pea that has been grown on the Aegean island of Santorini for at least 3500 years. In Greek, the word “fava” can refer to either the dried split peas or the appetizer spread that is made from them.

Although fava is grown across Greece, Santorini fava are slightly sweeter than those grown elsewhere and are widely considered to have superior flavor. Santorini is also famous for its
“waterless” tomatoes and its capers; Santorini Fava Pie uses all three ingredients.

The crust for the pie is made from puréed fava, and is a good way to use up leftovers. To make the crust, cooked fava is mixed with semolina flour, pressed into a tart pan, and baked until it’s slightly crispy. Baked fava develops a wonderfully nutty flavor that enhances the filling ingredients. Because it doesn’t need to be rolled out, fava crust is simple to make.

Puréed fava is also the base of Fava Pantremeni, or “Married” Fava. The name refers to the wedding of fava and capers, two very compatible ingredients, in a single dish. The below recipe for Fava Pantremeni is based on a dish we ate last summer at
Logia tis Ploris, an Athenian fish taverna.

Although it's difficult to find fava outside of Greece, yellow split peas are a fine substitute.

Santorini Fava Pie with Tomatoes, Capers, and EggsSantorini Fava Pies with Tomatoes, Capers, and Eggs (Σαντορίνη Φάβα Πίτες με Ντομάτες, Κάπαρης και Αυγά)
Serves 6 as an appetizer
Adapted from
Simply Plated 2

Crust:
1 1/2 cups fava purée (see recipe below)
6 – 10 Tbsp. semolina flour

Tomato Filling:
2 Tbsp. olive oil
1 1/2 cups thinly sliced onions, cut in quarter moon slices
Salt
Freshly ground black pepper
1/2 tsp. Aleppo pepper (optional)
1 14.5-ounce can diced tomatoes, or 1 1/2 cups fresh, with juices
1/4 cup water
1 bay leaf
2 tsp. oregano
3 Tbsp. minced sun-dried tomatoes in oil or 1 1/2 Tbsp. tomato paste
2 Tbsp. capers, preferably salted, rinsed and soaked

6 eggs

Make the Crust: Taste the fava purée and add salt, pepper, or oregano, as needed; the crust should be well-seasoned or the pie will be bland. Stir in 6 Tbsp. of semolina flour, and additional flour as needed to make dough that is the texture of thick mashed potatoes; the amount of flour depends on the moisture level of the fava purée. Taste again to make sure the seasoning is correct. (This can be made ahead.)

Make the Filling: Sauté the onions, lightly seasoned with salt and freshly ground black pepper, in the olive oil until the onions soften and start to turn golden. Stir in the Aleppo pepper and cook for 1 minute. Stir in the tomatoes, water, bay leaves, and oregano. Bring to a boil, turn down the heat, and simmer for 45 – 60 minutes, or until the sauce is thick and most of the liquid has evaporated. Turn off the heat and stir in the sun-dried tomatoes and capers. Taste and add salt or freshly ground black pepper, as needed.
(This can be made ahead.)

Make the Pie: Preheat the oven to 425°F.

Light grease 6 small tart pans (I prefer 4.5” tart pans with removable bottoms). Divide the fava dough between the pans. Press out the dough to completely cover the bottom and sides of the pan. Bake for 10 – 15 minutes, or until the crusts are lightly browned and crispy around the edges. Turn down the oven to 350°F.

Fill each baked crust with tomato filling, making an indentation in the filling that is deep enough to hold an egg. Crack an egg into a small bowl and carefully pour it into the indentation. Repeat until all the eggs are used. Sprinkle with salt and freshly ground black pepper.

Bake for 12 – 15 minutes, or just until the eggs are set; the yolks should be runny and the whites soft. Remove pies from the tart pans and serve immediately.

Fava PantremeniFava Pantremeni (Φάβα Παντρεμένη)
If you don’t have access to Greek fava, yellow split peas are the best substitute I’ve found.

Fava Purée:
1/2 cup Santorini fava or yellow split peas
6 Tbsp. olive oil
1 cup diced onion, 1/4” dice
Salt
Freshly ground black pepper
3 cups water
1 tsp. oregano
1 Tbsp. lemon juice

Pantremeni Ingredients:
1/2 cup diced onion, 1/8” dice
3 Tbsp. lemon juice
1/4 cup olive oil, plus more for drizzling
4 tsp. oregano
1/4 cup capers, rinsed and dried
1/4 cup diced tomatoes, 1/8” dice
(optional)

Make the Fava Purée: Put the fava in a strainer and rinse under cold running water. Sauté the onions, lightly seasoned with salt and freshly ground black pepper, in 1/4 cup olive oil until the onions soften and start to turn golden. Stir in the rinsed fava and water, bring to a boil, turn down the heat, and simmer for 1 1/2 to 2 hours until the fava turns into a thick purée. Stir the fava regularly to make sure it isn’t sticking to the bottom of the pan, particularly towards the end of the cooking time.

When the fava is the thickness you desire, turn off the heat and stir in the oregano, lemon juice, and remaining 2 Tbsp. olive oil. Taste and add salt, as needed. Cover with a dish towel and let cool to room temperature.
(At this stage, the purée is ready to be used in Santorini Fava Pie, above.)

Make the Fava Pantremeni: Stir the diced onion, lemon juice, and olive oil into the Fava Purée. Spread the purée out on a plate. Drizzle with olive oil. Sprinkle the oregano over the purée, then the capers, and then the tomatoes (if using).

Serve with a bowl of olives and crusty bread, or as part of an appetizer spread.
~~~~~~~~~~~~~~~~~~~~~~~
This is my entry for My Legume Love Affair – 9th Edition (MLLA9), created by Susan of The Well-Seasoned Cook, which I am hosting in March 2009.

Thursday, March 13, 2008

Recipe: Moroccan Chermoula and Carrot Soup (Μαροκινή Σούπα με Καρότα)

Something is happening in my vegetable drawer. I swear the carrots have been multiplying during the night. I can’t use them fast enough.

The real cause of the carrot explosion is their arrival in every CSA box we’ve received over the past few months. I love carrots, I’m glad they’re in the boxes, but I need to do better at keeping up with the inflow.

A new CSA box is arriving today, and yes, it will include another bunch of carrots. Last night, I took the carrot overflow problem in hand and made a wonderfully flavorful Moroccan Chermoula and Carrot Soup.

Although Carrot Soup is delicious on its own, the addition of Chermoula turns it into something special. I make the Chermoula while the soup is simmering, which means the entire recipe takes less than an hour from start to serving.

It’s hard for me to get enough Chermoula – I usually double or triple the recipe whenever I make it. I use the extra Chermoula to top grilled salmon, halibut, or chicken, or to add flavor to salads.

Moroccan Chermoula and Carrot SoupMoroccan Chermoula and Carrot Soup (Μαροκινή Σούπα με Καρότα)


Mediterranean Cooking in Alaska has moved as of March 2011. To read this post please go to


http://www.laurieconstantino.com/moroccan-chermoula-and-carrot-soup/


Please click on over and visit my new site. Thank you!


Wednesday, March 12, 2008

Recipes: Butternut Squash and Pancetta Risotto & Pan Fried Scallops and Capers (Κολοκύθα Ριζότο με Ιταλική Πανσέτα & Χτένια με Κάπαρης)

When I first started making risotto, Arborio rice wasn’t available in Anchorage, Alaska’s largest city. Because Arborio, a short-grain Italian rice, makes superior risotto, I imported it in my luggage or by mail-order. In those years, risotto was special occasion fare.

More recently, local stores stocked Arborio rice, but charged a premium for it. Although it became a pantry staple, ever cost-conscious, I still limited how often I made this toothsome treat.

Last month, our local Costco began selling imported Arborio rice in 3 kilo (6.6 pound) boxes for a very reasonable price. Now I guiltlessly make risotto whenever I want.

The firm, yet creamy, texture of perfectly cooked risotto is the perfect foil for vegetables of all kinds. Combined with
beets or squash, risotto is warming winter fare. In spring, I like it with peas or artichokes. In summer, I look forward to lighter risottos flavored with basil or lemons.

Yesterday, I needed to use a butternut squash that had been sitting on the counter for way too long. I also had a handful of leftover sea scallops. It was definitely time to make an old favorite: Butternut Squash Risotto with Pan-Fried Scallops.

Black-pepper pancetta from Salumi and salt-cured capers, booty from a recent trip to Seattle, rounded out my list of risotto ingredients. The result was an attractive, full-flavored dish that we enjoyed for a mid-week meal and that would be perfect for serving to company.

Butternut Squash and Pancetta RisottoButternut Squash and Pancetta Risotto (Κολοκύθα Ριζότο με Ιταλική Πανσέτα)
Serves 4 - 6
Butternut Squash and Pancetta Risotto makes a filling meal served on its own with a light salad. It pairs well with seafood; see recipe below for Pan-Fried Scallops and Capers, a lovely partner for the risotto. To make vegetarian Butternut Squash Risotto, leave out the pancetta, sauté the onions in olive oil, and use vegetable stock. To make the vegetarian version extra special, stir in a little truffle oil just before serving.

Squash:
1 1/4 pound butternut squash (1 pound cleaned; 3 cups cut in 3/4” dice)
3 Tbsp. olive oil
Salt
Freshly ground black pepper

Risotto:
1/2 cup diced pancetta, 1/4" dice
1 cup diced onion, 1/4” dice
Salt
(if the pancetta is very salty, omit the salt)
Freshly ground black pepper
1 cup Arborio rice
1 Tbsp. minced garlic
1 cup dry white wine
1 Tbsp. minced fresh thyme, sage, or rosemary
4 – 5 cups vegetable or chicken stock
3/4 cup freshly grated Parmesan cheese

Preheat oven to 450°F.

Roasting the Squash: Remove the squash skin with a knife or vegetable peeler, cut in half, remove the seeds, and cut into 3/4” dice. Put the diced squash on a rimmed baking sheet and toss it with salt, freshly ground black pepper, and 2 tbsp. olive oil. Bake for 20 – 25 minutes or until the squash is browned on at least one side. Remove from the oven and place in a strainer to drain off excess oil.
(The recipe may be made ahead to this point.)

Making the Risotto: In a sauté pan large enough to hold the finished risotto, sauté the pancetta until the fat renders and the pancetta begins to brown. Stir in the onions, lightly seasoned with salt and freshly ground black pepper, and sauté until the onions soften and begin to turn golden. Stir in the rice so it is completely coated with oil and cook, stirring, for 1 minute. Stir in the garlic and cook for one minute. Add the wine; bring to a medium boil and cook, stirring, until the wine is almost absorbed. Stir in the roasted squash.

Add 1/2 cup of stock and cook over moderate heat, stirring constantly, until the stock is almost absorbed. Keep adding stock, 1/2 cup at a time, and stirring until each addition of stock is almost absorbed. When the rice is half done, stir in the thyme.
(The recipe can be made ahead to this point, and finished right before serving. If you are going to make it ahead, after you take the rice off the burner, stir it until it cools down.)

Continue adding stock, 1/2 cup at a time, and stirring until the rice is tender, but still firm in the center (this takes 18 – 22 minutes). There may be stock left over. Stir in 1/2 cup of grated parmesan. Add stock until the risotto is the consistency you desire; it should be moist and creamy, not dry. Taste and add salt and freshly ground black pepper, as needed.

Serve immediately with the remaining grated parmesan on the side for sprinkling on top.

Scallops and Capers with Butternut Squash RisottoPan Fried Scallops and Capers with Butternut Squash Risotto (Χτένια και Κάπαρης με Κολοκύθα Ριζότο)
Serves 6

Don’t start cooking the scallops until the risotto is done.

1 recipe Roasted Butternut Squash Risotto (see above)
2 Tbsp. capers (preferably preserved in salt)
12 large scallops (about 1 pound)
Salt
Freshly ground black pepper
1 Tbsp. olive oil
3 Tbsp. fresh lemon juice

If using salt-preserved capers, rinse off the salt and let them soak in cold water for 10 – 15 minutes, and then rinse them again. If using brined capers, rinse off the brine. Dry the capers.

Wash the scallops, removing any tough muscle clinging to the scallops' sides. Dry and season them on both sides with salt and freshly ground black pepper.

Heat the olive oil over high heat in a frying pan large enough to hold all the scallops. When the oil is very hot, add the seasoned scallops, and cook for 2 – 3 minutes, depending on the scallops’ size. Turn the scallops over and cook for 2 – 3 minutes more. Except for turning them over the one time, do not move the scallops or fidget with them while they cook. The scallops will brown better if they aren’t repeatedly turned.

While the scallops are cooking, warm up 6 plates (this is easiest to do in a microwave; put the dry plates in the microwave for 1 minute on high). Place equal amounts of risotto on each of the warmed plates.

When the scallops are done, turn off the heat and top each serving of risotto with two scallops. Stir the lemon juice and capers into the still-warm pan, scraping up any browned bits on the pan’s bottom.

Top each scallop with a drizzle of pan juices and a sprinkling of capers. Serve immediately.

~~~~~~~~~~~~~~~~~~~~~~~~~

Τhis is my entry for Weekend Herb Blogging hosted this week by Kel from Green Olive Tree.